
Full yogic breathing is a simple deep breathing technique that offers so many benefits.
Learn to practice it step by step along with a video.
Full yogic breathing is a simple deep breathing pranayama with many profound benefits. It revitalizes the entire body with prana (the life force energy). It is sometimes known as three-part breath because it works with three different sections of the lungs and naturally engages both lungs, fully improving oxygenation and circulation of the blood.
Benefits of full yogic breathing
- relieves stress and anxiety
- refreshes the mind
- activates the parasympathetic nervous system
- encouraging a calmer, more balanced state of being
- makes you feel centered, or grounded
- helps to correct unhealthy breathing patterns by embodying an understanding of effective use of the diaphragm
- the full motion of the diaphragm improves digestion and metabolic function
How to practice the full yogic breath
When we coordinate a number of different mechanisms of breathing in harmony, we can practice full yogic breath correctly and effectively. So when I teach full yogic breathing I split it into three components and encourage students to learn just one component at a time. And then, when you are proficient with each one, you’ll be ready to practice full yogic breath and be ready to utilize both your lungs in their full capacity.
So, let’s break it down. What are the three techniques that come together to form a full yogic breath?
1. Abdominal (diaphragmatic) breath
Abdominal breathing, also known as belly breathing or diaphragmatic breathing, can unlock the secret to proper exhalation. With better exhalation, your inhalation will also improve. It focuses on healthy and full use of diaphragm and develops the awareness of breath in the lower part of the lungs.
As a beginner, to make it easier, you may try diaphragmatic breathing in a lying-down position.
To practise abdominal breathing:
- Sit or lie down on a comfortable, flat surface, and relax your body. If there is any strain in your back, keep your knees slightly bent. This exercise can also be performed in a standing position.
- Relax your shoulders, head, and neck by gently rolling them a couple of times.
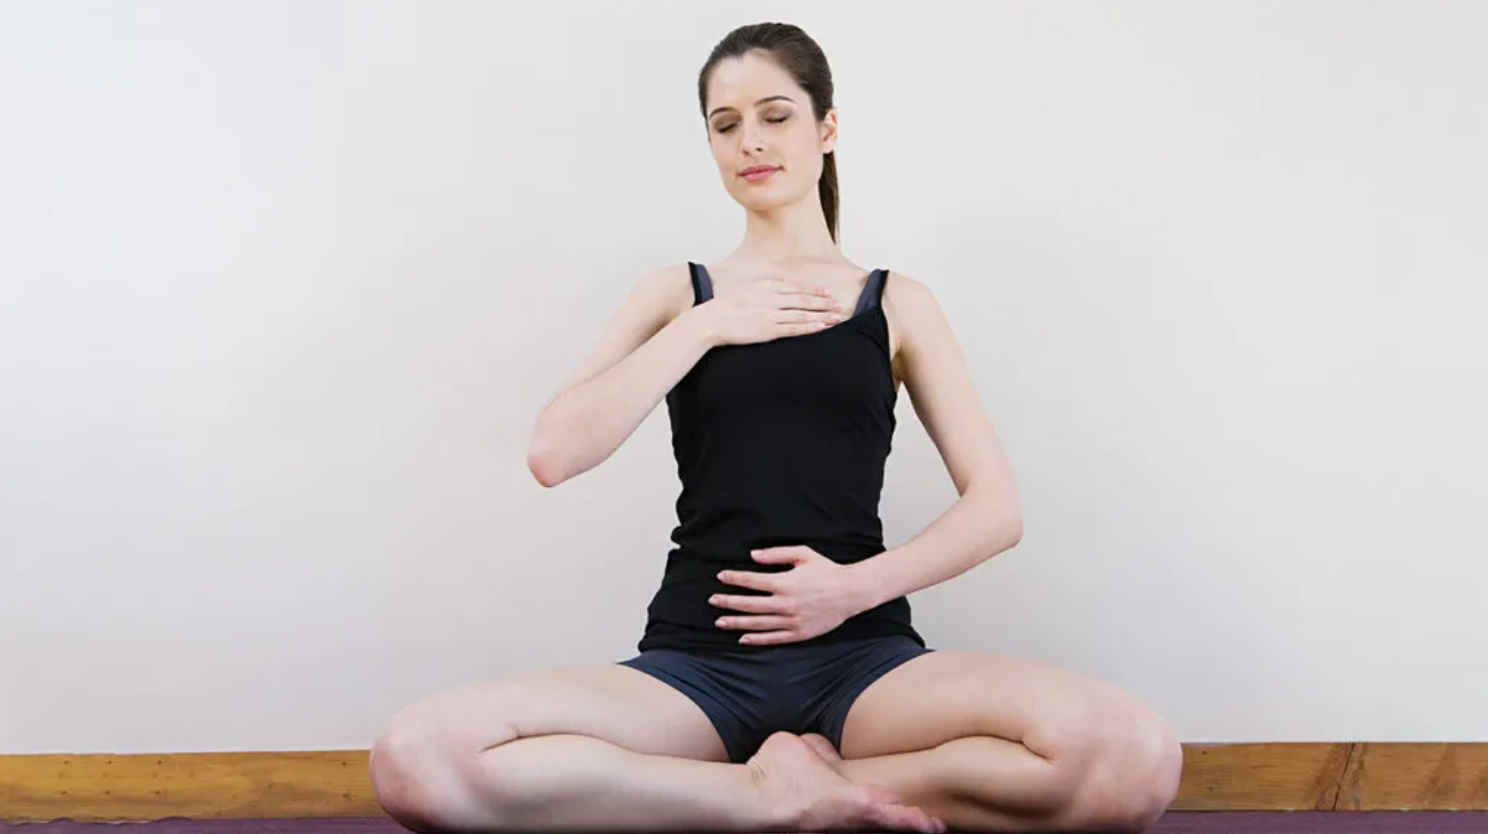
- Put one hand on your chest and the other hand on your belly.
- Take a long, full, easy breath in through your nose, and fill your lungs up completely.
- As the lungs get fully filled, the diaphragm moves down, expanding your abdomen and sides of the waist. Your chest remains relatively still, while the hand on your belly gently rises.
- Exhale all the air slowly through your nose or pursed lips (as explained above) for a count of four or six. Feel the abdomen gently getting pulled towards your spine. The hand that is resting on your belly will gently come back to its original position.
- Repeat these steps ten to fifteen times, observing your belly rising and falling with every breath.
- Breathe deeply, feeling relaxed and peaceful.
Tip: There’s no need to think too much about the diaphragm or force any movement in this muscle. It’ll happen naturally, as a result of the breath reaching to the lower parts of the lungs.
2. Thoracic (chest) breath

When you’ve established your abdominal breathing practice, you can begin to work with thoracic breath — the second component of full yogic breathing. This helps you to notice the middle area of the lobes of the lungs. Rather than emphasizing the movement of the abdomen, you allow greater movement in the ribs and minimize abdominal movement.
To practise thoracic breathing:
- Sit or lie down on a comfortable, flat surface, and relax your body. If there is any strain in your back, keep your knees slightly bent.
- Relax your shoulders, head, and neck by gently rolling them a couple of times.
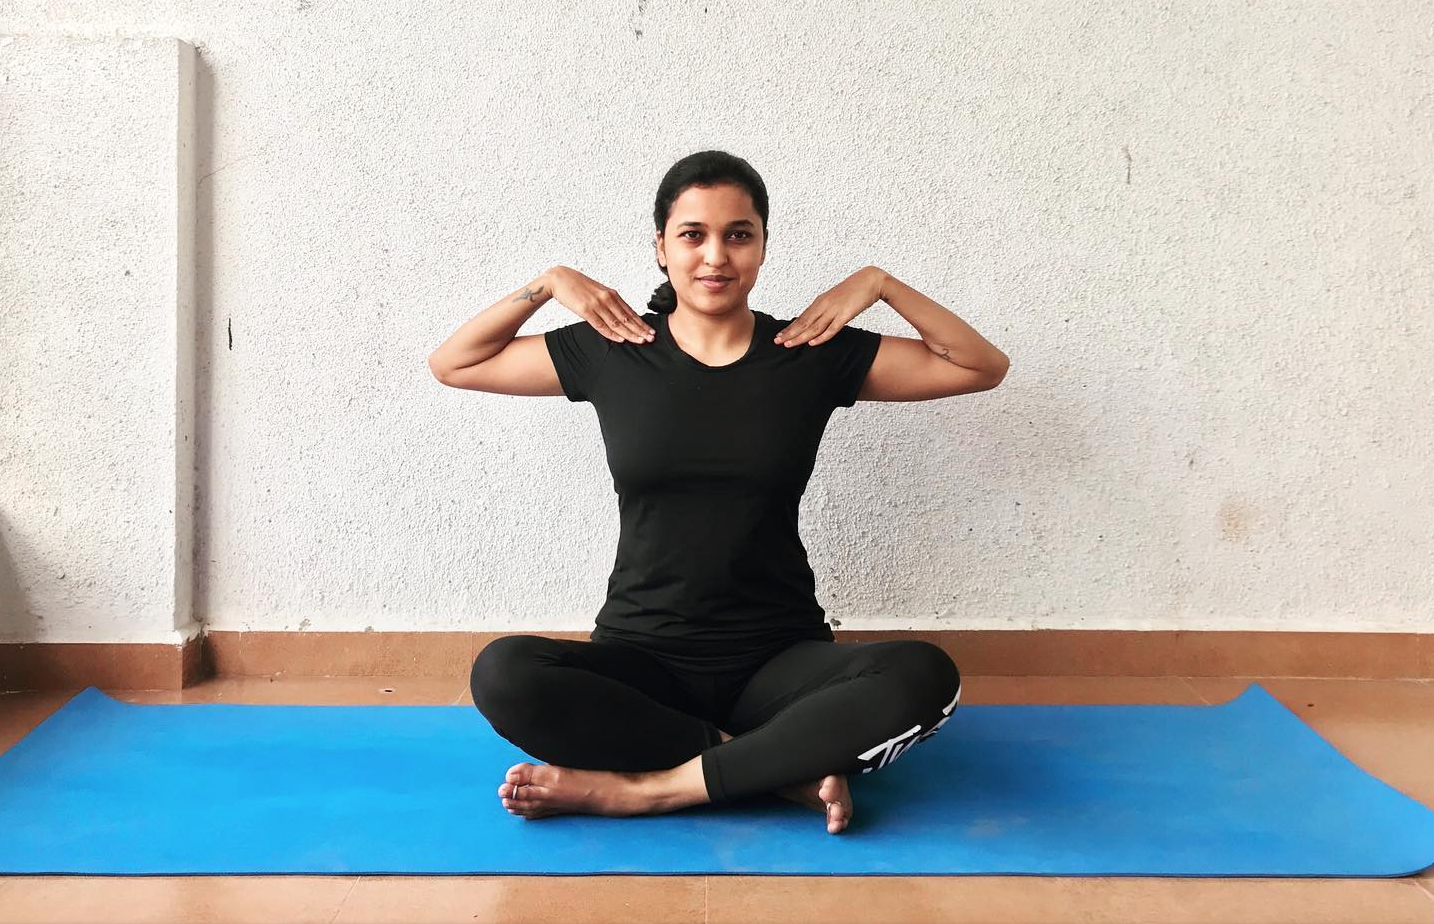
- Put one hand on your chest and the other hand on your belly.
- Take a long, full, easy breath in through your nose, and fill your lungs up completely.
- Expand the chest and ribcage as much as you can without allowing the abdomen to expand.
- To exhale, first relax the chest muscles. Allow the contraction of the ribcage to push the air out of the lungs.
- Keep going with this for a few minutes. Slow breaths into the chest, and out of the chest.
Tip: If at any point during this practice you start to feel dizzy, lightheaded, or anxious, pause! Take a few easy, natural breaths and resume when you’re ready.
3. Clavicular (apical) breath
The third component of full yogic breath helps you to develop awareness about the upper portions of your lungs. It is recommended to learn abdominal breath and thoracic breath properly before clavicular breath.
To practise clavicular breathing:
- Sit or lie down on a comfortable, flat surface, and relax your body.
- Relax your shoulders, head, and neck by gently rolling them a couple of times.
- Become aware of the natural rhythm of the breath.
- Take a long, full, easy breath in through your nose, and fill your lungs up completely.
- Expand the chest and ribcage as much as you can.
- When you feel that the ribs are expanded to maximum capacity, inhale further until you feel expansion in the upper part of the lungs, right up to the collarbone. The shoulders may get lifted a little.
- This requires some effort, and you may not feel at ease in the beginning. Just a couple of rounds everyday should be enough to learn this breathing technique.
- To exhale, first release the breath from the collarbone and upper chest, and then allow the ribcage to contract.
4. Full yogic breath – putting all 3 components together
When you feel confident that you have got the hang of each of the components above, you may gradually begin the wonderful practice of full yogic breath.
In full yogic breath, you draw together all of individual components you’ve learnt to build the deepest possible breath:
To practice full yogic breath:
- Sit comfortably, or lie down on your back and relax your body.
- Put one hand on your upper chest and the other hand on your belly.
- Take a long, full, easy inhalation in through your nose, and gradually start filling your lungs up completely.
- As you do this, the lower portions of the lungs get full, the lower abdomen expands first. Continue to inhale deeply, the middle lungs get full, expanding your chest outwards and upwards. During the last phase of inhalation, the upper or the apical part of the lungs get full and your collarbones and shoulders expand.
- After the full inhalation, start to exhale as you relax your shoulders, chest, and abdomen, drawing the naval back towards the spine to expel all air from the lungs.
- If you are comfortable, you may hold the breath out for a few seconds at the end of the exhalation.
- And that is one full yogic breath. It’s a continuous, smooth movement of filling up and emptying out your lungs fully.
- Repeat the above steps for seven to ten times, taking deep breaths. Keep your breath long, even, smooth and effortless.
Tip: Keep a gentle smile on your face, avoid tensing your face, neck, throat. It takes practice. Be gentle with yourself, and enjoy the process.
Now, take a moment to appreciate the practice you’ve done to get here. Dedicating time to your pranayama practice is a simple yet powerful act of self care. Well done!
Learn full yogic breath and many more pranayamas with a certified teacher
Sri Sri Yoga Foundation Program can give you an opportunity to learn the basic asanas, pranayama, meditation along with empowering yoga wisdom.